Snack Attack vs. Zack Attack

My favorite snacks and my favorite Zacks.

DSC05530

Roasted Tamari Chickpeas

This recipe is really easy and quick – and you can store these guys for later when you’re watching a Saved By The Bell marathon.

Ingredients

  • 1 can chickpeas, drained and rinsed
  • 1 T toasted sesame oil
  • 2 T Tamari soy sauce

Directions

  • Preheat oven to 400 degrees F
  • In a bowl, coat chickpeas with sesame oil and soy sauce
  • Spread chickpeas onto a baking sheet (preferable something with a lip on the edge to prevent liquid draining off)
  • Bake for 20 minutes
  • Take baking sheet out of the oven, toss chickpeas
  • Bake for another 15 minutes
  • Let cool and enjoy!

DSC05535

Baked Sweet Potato Fries

I’ll admit this was lunch yesterday with some BBQ sauce.  Not so much a snack, but not really ‘lunch’ either.

Ingredients

  • 1 sweet potato
  • 1 T olive oil
  • salt

Directions

  • Preheat oven to 450 degrees F
  • Slice sweet potato into 1/2 wedges – or whatever magical shape suits your fancy.  Unicorn shapes?  Lightning bolts?  Mustaches?
  • Arrange slices on a baking sheet, coat with oil, and sprinkle on a desired amount of salt (or any seasonings you feel like – I use curry a lot)
  • Place baking sheet in oven and bake for 20 minutes
  • Remove baking sheet, flip slices over, and bake for another 15 minutes

I should let you know that my oven doesn’t seem to heat up all the way, so you might want to reduce these times or the temperature.  Don’t want no burnt Zacks snacks.

Veggie Thing! It’s aliiiiiiive!

Picture 2

Hey Dudes!  Dudelettes!  Citysearch.com has put together a great resource for vegans and vegetarians alike – introducing VeggieThing!  A bunch of bloggers are contributing their photographs and reviews of restaurants, complete with photos, prices, and specific dishes.  Everything is organized by city, so you can scope out hometown deals or take this bad boy in the road when you’re in need of something cheap and delicious in your destination of choice.  Another great feature is the “Submit Your Own Pic” button at the bottom of the page, so the site is interactive and all-inclusive.  You scream, I scream, we all scream for Veggie Thing!

Daring Bakers April: Lavender Infused Cheesecake With Blueberries

ninja_w

The April 2009 challenge is hosted by Jenny from Jenny Bakes. She has chosen Abbey’s Infamous Cheesecake as the challenge.

As soon as I saw this challenge, I felt the fond memories of this post washing over me.  I felt like the old lady in Cats singing about her bygone youth.  Nothing like cheesecake to make a gal howl in the moonlight.

dsc05239

I decided to use a different recipe this time, and unfortunately it wasn’t as good as the other one!  It still tasted good, but definitely a “vegan” dessert.  I served it to some omni friends at a dinner party and was pretty bummed about the taste.  I’m trying to sway people here!  And it certainly didn’t help that one of my friends believes some rather silly myths about soy being “indigestible” by the human body.  I meant to ask him how the  continent of Asia managed to thrive with all that poison coursing through their bodies for the past … six millenia.  But anyway.  Cheesecake fail revoked my argument permission.

Ingredients

Tofutti (total of 24 oz) room temperature
1 cup / 210 g sugar
1 C firm silken tofu
1 cup / 8 oz soy milk
2 T lavender flowers
4 T corn starch
1 tbsp. lemon juice
1 tbsp. vanilla extract (or the innards of a vanilla bean)

Crust

2 C graham cracker crumbs
1 stick Earth Balance, melted
2 T vegan  sugar
1 t vanilla extract

Blueberry Topping

3/4 bag frozen blueberries
1/4 C freshly squeezed orange juice
1/3 C sugar
2 T corn starch
1 t cinnamon

Directions

1. Preheat oven to 350 degrees F.

2. Mix together the crust ingredients and press into your preferred pan. You can press the crust just into the bottom, or up the sides of the pan too – baker’s choice. Set crust aside.

3. Heat soymilk until hot but not boiling.  Place lavender flowers in the soymilk and steep for 15 minutes.  Strain the flowers out of the soymilk and set milk aside.

dsc05216

4. Combine cream cheese and sugar in the bowl of a stand-mixer (or in a large bowl if using a hand-mixer) and cream together until smooth. Add tofu and blend until smooth. Add soy milk, vanilla, lemon juice, and blend away to your heart’s desire until creamy.

dsc05215

Ew?

5. Pour batter into prepared crust and tap the pan on the counter a few times to bring all air bubbles to the surface.

6. Bake 45 to 55 minutes, until it is almost done – this can be hard to judge, but you’re looking for the cake to hold together, but still have a lot of jiggle to it in the center. You don’t want it to be completely firm at this stage. Close the oven door, turn the heat off, and let rest in the cooling oven for one hour. This lets the cake finish cooking and cool down gently enough so that it won’t crack on the top.

7. While the cheesecake is in the oven, prepare your blueberry topping.  Place all your ingredients in a small saucepan and heat on a low/medium flame until berries look ready … oops.  I didn’t time myself – just estimate!  C’mon!  We’re Daring Bakers afterall.

8. After one hour, remove cheesecake from oven. Let it finish cooling on the counter, and then cover and put in the fridge to chill. Once fully chilled, it is ready to serve.

dsc05231

Omg, so easy right?  Yeah not that easy, but it sure does look nice.  The lavender was OK – I could have done without it.  I really wanted to use it because there is a ton growing in my garden!  I also got my lemons and oranges just outside my front door!  It was nice to use (uber)local ingredients, but I’ll probably stick to my old tried and true recipe next time.  The cake tasted a little too tofu-y.  It reminded me of something you could get at Souen – just with a lot more sugar.  Well, ya live and ya learn and there will always be another day for cheesecake.

Vegan Coachella: Day 1

Oh, hey Paul McCartney.  From where I was standing, I could not see anything but the backs of those in front of me.  However, holding my camera above my head and zooming in allowed me to have a private face-to-face performance every time.  Thanks to Carl Zeiss for that sweet zoom lens.  Note to self: Bring stilts next year.

SO.  Day 1 of Coachella was pretty tremendous on the music and vegan food front.   Leonard Cohen, Beirut, Morrissey, and Paul McCartney killed it.  This incident was marvelous.  But let’s backtrack.  Before getting to the actual music venue, the boyfriend and I stopped at Native Foods in Palm Springs.  I had never been there, but heard so many marvelous things that it became a necessary destination.

dsc05247

I ordered the Royal Thai Tofu Salad, which was beautifully presented and refreshing, but not really something I would order again.  There was simply too much cabbage and not enough tofu.  I left still feeling a little hungry, but I suppose that’s what one should expect when one dines on salad alone.  On the other hand, my boyfriend ordered the Baja Surf Tacos which were INCREDIBLE!

dsc05249

Mock fried fish(seitan? tempeh? don’t rememer?), cabbage, tomatoes, some kind of tartar sauce, and guacamole on top of soft tacos.  So filling and wonderful!  I want to try to replicate this one soon.  We went back to the restaurant on Monday and ordered these again!

We met the owner/chef Tanya, who was really friendly!  She got really excited that I was blogging her restaurant when she caught me taking pictures.  We tried to convince her to open a Native Foods closer to where we live – specifically Silverlake because the neighborhood is fostering a lot of great vegan places that are thriving (most of which don’t even come close to rivalling NF!). Please please please do it!

dsc05244

I had really good Iced Chai for dessert before we hopped on our bikes to head into the festival.  We had dinner at an Asian place in one of the food areas inside Coachella, but I failed to document it due to my ravenous beastly hunger.

To be continued…

Spring Awakening

dsc05168

That’s right kids, it’s time to start eating flowers again.  This salad was simple and awesome – spinach, 3 kinds of beans, olive oil, balsamic vinegar, salt, pepper, and nasturtiums picked from the garden!  It’s so refreshing to sit outside at dinner with the sun still up.  My garden is getting bigger and bigger – I feel like I’m watching some preschoolers start to read.  I’m a little overzealous about it – when my soybeans started sprouting I jumped up and down and ran a few victory laps.  The zucchini plants are getting huge and my tomatoes, basil, and onions are starting to peek their little heads out of the ground.  Soon I’ll put up some pictures of my little plant babies, but for now this electric neon salad will have to do.  Here’s a list of edible flowers – get to it!

dsc05169

Pure Joy

Everyone who knows me probably wants to smack the words “Pure Luck” outta my mouth at this point.  It’s my favorite restaurant in town and I probably * name drop the place twice a day.  It’s time I show the place some e-love.

dsc05159

Let me introduce you to my favorite thing on the menu – the Jackfruit Carnitas Burrito.  See that stuff that looks like murder pulled pork?  That is the stuff of dreams – the jackfruit.  Sweet and reminiscent of a milder apple, the jackfruit translates into an incredible savory meat substitute in this burrito.  It’s shredded and coated with barbecue sauce and really it’s just something you have to try for yourself.  I mean, who doesn’t want to taste the world’s largest tree fruit!?  Get to it!!  And what is that stuff lurking to the right of Sr. Burrito?  Why it’s my favorite food of all time!  What do you know!

dsc05154

Ah sweet potato fries.  I gotta say, I make baked sweet potato fries better than most places … but Pure Luck does a girl right.  Usually.  If you know about the whole debacle, I’ll spare you.  If you don’t … click on that link.  Long story short, they have good days and bad days.  This picture was taken on a GOOD day.  They serve these guys with a side of sauce made of what I am guessing is Veganaise and BBQ sauce and it’s heaven in a little paper cup.  Do yourself a favor and order these.

dsc05156

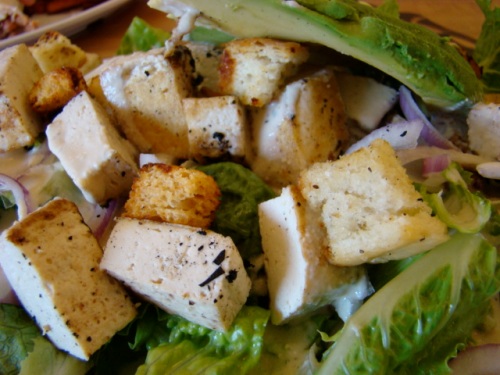
I’m also a big fan of the Vegan Caesar here when I want something lighter.  It’s crunchy and garlicky the tofu is (usually – not the day of this photo) done just right. I love this place.  I’m not a beer drinker, but I know from other people that the beer is cheap, organic, and GOOD.  I also don’t have a photo of the plantains but DAMN.  They’re insane.  They can top them with vegan whipped cream and put em in a taco or just serve them straight up and they’re delicious.

Coming soon is my review of Scoops – the LA classic.  Ride your bike down there and fuel your ride home properly!

*This marks the first time I reveal my identity on my blog.  Get siked about it!

How Dare You Post So Late, Baker!

Oops.  March kind of slipped through my fingers … I blame the ides.  Speaking of ides, I made a Caesar Salad with Tempeh Croutons (to go with the rest of my post…)

img_3860

I’ll put up that recipe later … Now!  On to the more important matter at hand – March’s Daring Bakers Challenge!

Lasagne of Emilia-Romagna (veganized)

(From The Splendid Table: Recipes from Emilia-Romagna, the Heartland of Northern Italian Food by Lynne Rossetto Kasper (published by William Morrow and Company Inc., 1992))

img_3894

Recipe

(Serves 8 to 10 as a first course, 6 to 8 as a main dish)

Preparation Time: 15 minutes to assemble and 40 minutes cooking time

10 quarts (9 litres) salted water
1 recipe Spinach Pasta cut for lasagna (recipe follows)#1
1 recipe Bechamel Sauce (recipe follows)#2
1 recipe Country Style Ragu (recipe follows)#3
1 cup (4 ounces/125g) freshly grated Parmigiano-Reggiano

Method
Working Ahead:
The ragu and the béchamel sauce can be made up to three days ahead. The ragu can also be frozen for up to one month. The pasta can be rolled out, cut and dried up to 24 hours before cooking. The assembled lasagne can wait at room temperature (20 degrees Celsius/68 degrees Fahrenheit) about 1 hour before baking. Do not refrigerate it before baking, as the topping of béchamel and cheese will overcook by the time the center is hot.

Assembling the Ingredients:
Have all the sauces, rewarmed gently over a medium heat, and the pasta at hand. Have a large perforated skimmer and a large bowl of cold water next to the stove. Spread a double thickness of paper towels over a large counter space. Preheat the oven to 350 degrees Fahrenheit (180 degrees Celsius). Oil or butter a 3 quart (approx 3 litre) shallow baking dish.

Cooking the Pasta:
Bring the salted water to a boil. Drop about four pieces of pasta in the water at a time. Cook about 2 minutes. If you are using dried pasta, cook about 4 minutes, taste, and cook longer if necessary. The pasta will continue cooking during baking, so make sure it is only barely tender. Lift the lasagne from the water with a skimmer, drain, and then slip into the bowl of cold water to stop cooking. When cool, lift out and dry on the paper towels. Repeat until all the pasta is cooked.

Assembling the Lasagne:
Spread a thin layer of béchamel over the bottom of the baking dish. Arrange a layer of about four overlapping sheets of pasta over the béchamel. Spread a thin layer of béchamel (about 3 or 4 spoonfuls) over the pasta, and then an equally thin layer of the ragu. Sprinkle with about 1&1/2 tablespoons of the béchamel and about 1/3 cup of the cheese. Repeat the layers until all ingredients are used, finishing with béchamel sauce and topping with a generous dusting of cheese.

Baking and Serving the Lasagne:
Cover the baking dish lightly with foil, taking care not to let it touch the top of the lasagne. Bake 40 minutes, or until almost heated through. Remove the foil and bake another 10 minutes, or until hot in the center (test by inserting a knife – if it comes out very warm, the dish is ready). Take care not to brown the cheese topping. It should be melted, creamy looking and barely tinged with a little gold. Turn off the oven, leave the door ajar and let the lasagne rest for about 10 minutes. Then serve. This is not a solid lasagne, but a moist one that slips a bit when it is cut and served.

My Alterations

I used a pasta recipe from Bryanna Clark Grogan for my handmade noodles, a  Mushroom Lentil Ragu recipe from Eat The Right Stuff, and a Beschamel recipe from Vegan Dad.  I adapted everything to my own needs and it worked out really well!  I made everything all in one day, starting with the sauces in the morning.  I took a break to go throw a frisbee in the park (it’s gorgeous outside!) and came back to work on the noodles.  For the parmesan, I ended up using shredded FYH Mozzarella – this was the first time it didn’t melt perfectly for me.

Right now, I’m in a kitchen that is equipped with little more than a stove and one pot, but I made this thing work!  I ended up kneading my dough by hand and rolling it out on the dining room table, using a giant bottle of soy sauce as a rolling pin.  I used to make pasta when I was a kid with my parents, but we used a machine and there were usually eggs involved.  They’re really not necessary!  I even used semolina in place of the chickpea/soy flour and everything held up really well.  The mess wasn’t too heinous and I would probably make this recipe again if I wanted to impress someone with my Italian prowess.  I do have dual Italian citizenship, so it’s about time I prove my worth with some homemade pasta!

img_3871

Best served to friends and family outdoors with romantic lighting.  Don’t invite anyone you don’t want falling in love with you.

Whole Wheat Chocolate Chip Scones For Your Mom

dsc05080

Ok, so they’re for my mom.  Your mom can have some too if she’s pleasant.  Moms deserve a little treat every now and then – they’re such sweet ladies.  The mom I have is a health-nut with a dark chocolate addiction (is it ok that I air these things out in public?)  There is a “museum” of dark chocolate in one of the drawers in my parents’ kitchen.  It’s really a stunning display.  AND my mom has this classic Chocolate Chip Scone recipe from an old Mary Englebright magazine that has been a favorite for years.  However, that recipe calls for dreadful items like white flour, eggs, milk, and butter.  Luckily, I managed to save my mom from the blight of unhealthy scones and created a safe haven for those normally-healthy-folk who have a predisposition to chocoholism.  Look at those monster chocolate chips!  They’re taking over the world!

Recipe

Ingredients

  • 3/4 C White Whole Wheat Flour
  • 1/4 C Oat Bran
  • 1 1/2 t baking powder
  • pinch of salt
  • 1/2 t cinnamon
  • 1 Tablespoon agave nectar
  • 1/4 C chocolate chips
  • 2 T cup margarine, softened
  • 1/2 t apple cider vinegar
  • 1/3 C soy milk

Directions

  • Preheat the oven for 400 degrees
  • Measure the soy milk in a measuring cup and add the apple cider vinegar, set aside to let curdle.
  • Sift the dry ingredients (flour, oat bran, baking powder, salt, cinnamon) in a large mixing bowl.
  • Add the margarine in small slivers and cut into the dry ingredients using two knives (This is to incorporate the margarine while allowing it to stay in small chunks. You just don’t want it to melt at all – creates little buttery pockets in the scones)
  • Add the agave nectar and soy milk mixture – combine until there are no more dry parts. Be sure not to overmix.
  • Add the chocolate chips and stir until incorporated.
  • Press the dough into a circle about 3/4 in tall, cut into triangle shapes (can make 4 big scones, or 8 small)
  • Arrange scones on greased baking sheet.
  • Brush tops of scones with soy milk and sprinkle with rock salt.
  • Put scones in your preheated oven and bake for 10-15 minutes or until a deep golden brown on the edges.

Pretty easy, huh?  You could probably double this recipe pretty easily for a crowd, but I didn’t want too many of these sitting around because there were only three of us to feed.  This is a great (relatively healthy) scone recipe to keep around for tea time or breakfast or a snack or putting on your pants time or stay in bed all morning time or going to a roller derby time or calling up your Aunt Ida or changing the water filters or pre- or post-bike-ride or…

dsc05092


P.S. Look India!  I updated!

Daring Bakers February: For The Love of Chocolate

blue_db

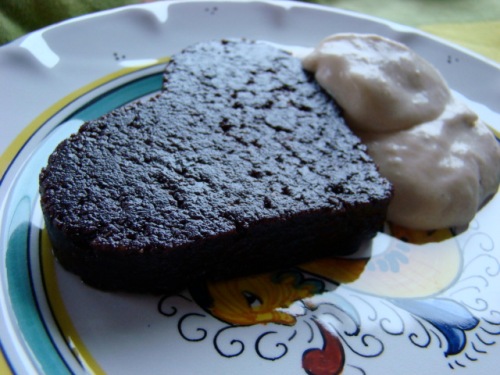
With much thanks to February’s hosts – Wendy of wmpesblog and Dharm of DadBaker – I give you my take on a Flourless Chocolate Cake and vanilla ice cream. The original recipes posted in the DB forum were chock full o’ heavy creams and eggs so I decided to check out what the other alternative (we’re just like the Gin Blossoms) bakers were doing. Shelleyfish brought forth a recipe for a raw chocolate cake and I had to bite. I’m of the brownies-for-breakfast foodie school, so I like to try to work healthy foods into my diet in sneaky ways. I’m like Jessica Seinfeld minus the children. The only one I’m duping is me.

dsc05046

Recipe (from Jennifer Cornbleet’s Raw Food Made Easy)

Ingredients

1 1/2 cups raw walnuts, unsoaked
dash salt
10 pitted medjool dates, unsoaked
1/3 cup unsweetened cocoa or carob powder
1/2 teaspoon vanilla extract (optional)
2 teaspoons water
1/2 cup fresh raspberries for garnish (optional)

Directions

  • Place walnuts & salt in food processor fitted with S blade and process until finely ground.
  • Add the dates, cocoa powder, and optional vanilla and process until the mixture begins to stick together.
  • Add the water and process briefly.
  • Transfer to a serving plate and form into a 5-inch round cake. Chill for 2 hours.
  • Decorate the cake and plate with fresh raspberries before serving if desired.
  • Covered with plastic wrap this will keep for three days in the fridge, or two weeks in freezer. Bring to room temp. before serving.

To accompany my raw chocolate friend, I called up his pal Raw “Vanilla” Sorbet.

Recipe

Ingredients

5 bananas – peeled, sliced, and frozen

1/3 C coconut cream (refrigerate coconut milk and scrape off the solids)

1/3 C coconut milk (the remaining liquids in the can)

4 T agave nectar

1 t vanilla

Directions

  • Place all your ingredients in a blender (preferably Vita-Mix because it owns) and blend until creamy.
  • Freeze again to let it set up, or just scoop it out with a spoon because you won’t be able to resist.

dsc05050

My sorbet looks a bit mushy because I was trying to rush to get this post up today and trying to take my photos before the natural light went away! So there was no time to freeze it before taking the picture. Boo. It tasted wonderful though! Neither the banana flavor or the coconut was too strong – it didn’t taste anything like a pina colada so I was happy. I pressed my cake into cookie cutter molds in honor of Valentine’s Days past. The cake itself is delicious – you only need a couple bites because it is so dense and rich. The thing I love the most about raw desserts is the fact that you’re really just eating fruit and nuts. So you can indulge without the sugar rush and feel like you’re building muscles so you can be big and strong. Ya know.

No Knead

dsc04939

Let me introduce my first loaf of bread.  He’s a tough guy on the outside, but soft and bubbly when you get to know him on the inside.  He smells a little bit like beer (but in a good way) and he’s always down for a good romp in the Earth Balance.  Ignore him and he gets a little dry, but treat him with kindness and warmth and he’ll return the favor.  Best of all, he’s not kneady.  Oh my god.

Bread baking seems to be a bit of a lost art nowadays with the convenience of grocery stores – and if you live in New York, about fifty French bakeries in your neighborhood that probably do it better than you ever could (i.e. Sullivan Street Bakery). But I say to hell with convenience.  Give me a challenge!  Something to live up to!  Thanks to Mark Bittman and the New York Times, my task presented itself in black & white. Perhaps the word “challenge” should be redacted from this entire entry considering how easy the recipe is.  There are only four ingredients, and should water even count as an ingredient anyway?    Here is the Recipe, originally published in 2006:

Ingredients

3 cups all-purpose or bread flour, more for dusting
¼ teaspoon instant yeast
1¼ teaspoons salt
Cornmeal or wheat bran as needed

Directions

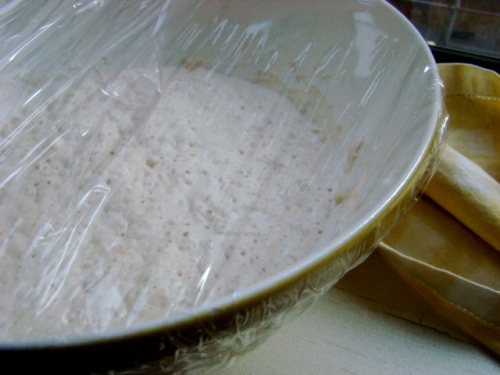
1. In a large bowl combine flour, yeast and salt. Add 1 5/8 cups water, and stir until blended; dough will be shaggy and sticky. Cover bowl with plastic wrap. Let dough rest at least 12 hours, preferably about 18, at warm room temperature, about 70 degrees.

dsc04915

2. Dough is ready when its surface is dotted with bubbles. Lightly flour a work surface and place dough on it; sprinkle it with a little more flour and fold it over on itself once or twice. Cover loosely with plastic wrap and let rest about 15 minutes.

3. Using just enough flour to keep dough from sticking to work surface or to your fingers, gently and quickly shape dough into a ball. Generously coat a cotton towel (not terry cloth) with flour, wheat bran or cornmeal; put dough seam side down on towel and dust with more flour, bran or cornmeal. Cover with another cotton towel and let rise for about 2 hours. When it is ready, dough will be more than double in size and will not readily spring back when poked with a finger.

dsc04923

4. At least a half-hour before dough is ready, heat oven to 450 degrees. Put a 6- to 8-quart heavy covered pot (cast iron, enamel, Pyrex or ceramic) in oven as it heats. When dough is ready, carefully remove pot from oven. Slide your hand under towel and turn dough over into pot, seam side up; it may look like a mess, but that is O.K. Shake pan once or twice if dough is unevenly distributed; it will straighten out as it bakes. Cover with lid and bake 30 minutes, then remove lid and bake another 15 to 30 minutes, until loaf is beautifully browned. Cool on a rack.

dsc04932

Yield: One 1½-pound loaf.

I gotta tell you, I had to add a hell of a lot more flour than the recipe calls for, so you’ll probably want to mess around with the ratios before you take your yeasty baby out of its cozy bowl-crib.  Heed this advice or prepare for massive clean-up duty.  Perhaps it was because I used half spelt flour?   Does tat make a difference?  I also set my bowl near a radiator during the overnight rise since it’s so cold ’round these parts.

The resulting loaf, while looking vaguely like a brain, tastes awesome.  Toasted with some EB and jam, it’s like a little slice of yeasty nirvana – if you can go for that kind of thing.

dsc049431

The inside shot.  My dad, who speaks of good bread as though it were the Holy Grail, always told me that big holes and hard crust are signs of excellence.  Well, check out THAT whopper.  Are you proud or WHAT.